Web Performance and Load Test is important part of the test cycle which help to verify the performance of the web application under load. Visual studio is one of the well known tool for Load and Performance test.Hence let's try to learn how to work with web performance test with Visual Studio in this post.
- Create New Project. Go to File-->New—>Project
- Popup window will open. Select Web Performance and Load Test Project from test projects section.

- Select View from the Visual Studio menu and select Open SQL Server Object Explorer from the pane. We can add new Databases from this SQL Server Object Explorer window.
- Right click on the Database folder and select Add New Database. Give suitable name and create a Database

-
Add new table called Users with two columns as UserId and Password to Database.
CREATE TABLE
[dbo].[Users] (
[UserId] INT NOT NULL,
[Password] VARCHAR (10) NOT NULL,
PRIMARY KEY CLUSTERED
([UserId] ASC)
);
- Add user ids and passwords of the users already registered in the application to the table you created.
- In this post, we are going to test the login scenario of the online shopping site.So far, we have created a data base , then add required login details to the table.
- Now we can record the test scenario using web test. Then we can parameterize the recorded test scenario to test more test data.
- Right click on the project in the solution explorer.Select Add-->Web Performance test
- Then IE browser will open where you can record the scenarios. You can start the scenario recording by providing the site URL.
- Following screen shows home page navigation.

-
Next click on Login link to go to login page

-
Provide User name and password. Click on Login button to logging to the customer account.

-
Now we have recorded the login scenario with valid user credentials. Click on stop button to stop recording. Wait until Dynamic parameter capture process completed.

- Now web recording is ready. If there is any unnecessary web requests recorded, you can remove those web requests from the recording.
- We have to create number of user records in our table. We need to login to the system using each of user details to verify the validity of each user. If we able to parameterize the user credentials, we can login to the system with each user using this recording
- If you expand the recorded web requests, you would be able to see the email and password values that need to be parameterized.

-
You can connect these email and password fields with the data base table fields.To do that, click on the Email field under Form Post Parameter. Go to properties window and click on value field. You would be able to see the arrow icon in the value field. Click on the arrow. Pane will open, click on Add Source Data link to connect to Database.

-
Select the type of the data source from the popup. In this post, we use Database. So, select Database and click on Next button.

-
Click on New Connection button. Select the connection string for the data source and click on continue.

-
In the next window, select server name and data base name. Click on Test Connection to verify the connection.

-
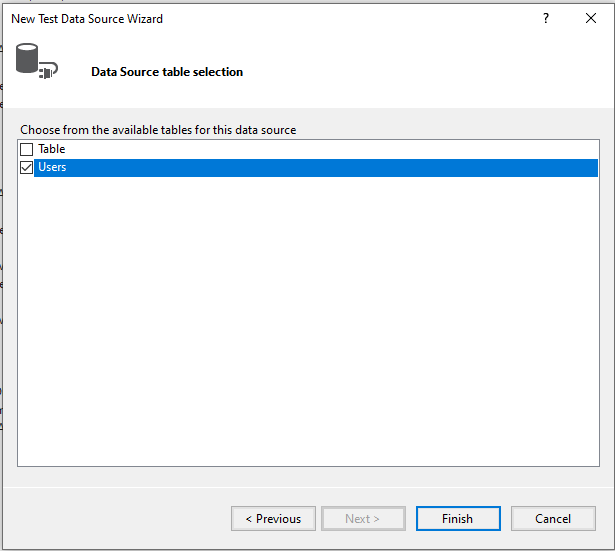
Next page will allows you to select the relevant database table. Select the database table and finish the process.
-
Now go to the value section of the Email. You would be able to select the values from the data base table.

-
Set database table field values to both Email and Password fields.

- In the load test project, you would be able to see the Local.testsettings file which allows you to decide execution count.
- Open the Local.testsettings file in the solution explorer.
- Select "Run test using local computer or test controller" radio button in the General section of test settings window.

- We have two options to decide the loop count of the test execution.
- If we set fixed count it will loop for fixed number of times with data in table.
- Select Web test. Set fixed run count. Click on Apply.

- If we select one run per data row option it will loop for each data row in the table.

- Use your preferred option to decide test run loops.
- Now we ready to run the web test. Go to web test and click on Run Test icon.

-
You would be able to see multiple runs as Run1, Run2, Run3 and Run4. All the four runs have passed. That mean DB table has valid user details.

This post has step by step explanation on how to create web performance test scenarios. We were able to learn how to record the scenario and parameterize the values in the web requests.


No comments:
Post a Comment